So you want to incubate some eggs, huh? Scared to fail? Worried you will spend money on hatching eggs and end up with nothing? These are all valid worries and concerns. I will try to simplify this process down to shed some light on what to do, and more importantly – why.
First, you need to understand what is the anatomy of an egg. If you understand the anatomy of an egg and each part’s role, you will have a better understanding of the hatching process and, therefore, better outcomes.

SHELL
The shell is made of calcium and actually is porous. There are tens of thousands of pores in the shell that allow the shell to “breathe”. The exchange of “stuff” which includes bacteria gets protected by something called the bloom. The bloom is an invisible layer of glycoproteins, lipids, and more science stuff that protects the egg from bacteria and other contaminants. This is why you never should wash eggs intended for hatching (and why eggs should be refrigerated if washed).
OUTER AND INNER MEMBRANE
Inside the shell is an outer and inner membrane. These membranes are another layer of protection keeping bacteria from the inside of the egg where the chick will form. The membrane wet is clear, but dried out it turns white. This is the part that if you ever heard anyone talk about a “zip locked” chick, this is the membrane they have to get through to get air. It is made of a protein called keratin and is surprisingly tough.
AIR CELL
Between the membranes and the shell, ideally at the larger round end, is an air cell or air sack. This is air cell gets bigger as the egg gets older. As the water content of an egg escapes the egg through the pores of the shell, the air cell gets bigger. This is one of the reasons freshest eggs hatch the best.
ALBUMEN
This is the part you know as egg white. It is clear until cooked and then it becomes bright white. This has about 40 proteins and is where the water content of the egg is kept.
CHALAZAE
These are whitish strands you may have noticed when you crack an egg into a dark colored pan. They tie the yolk to the membrane and help suspend the yolk where it needs to be suspended. This is why eggs that have been handled roughly do not hatch as well. The chalazea can tear and destroy the physical composition of the egg. They also will degrade with time, also another reason fresher eggs hatch better.
YOLK
Most people are familiar with what part of the egg is the yolk. When it comes to hatching, this is the part that holds all the nutrition for the baby. The yolk stores vitamins, cholesterol and fat to help the baby get a good start. The last thing a chick does as it is developing is absorb the yolk. The nutrition from the yolk allows the hatchling to live up to 3 days without food or water.
DIFFERENT TYPES OF INCUBATORS
There is a lot of chatter every spring online about what incubator is best to hatch chickens. It is important to understand that there is a difference in “better” and “easier to use” as far as brands are concerned. As long as the incubator holds a steady 99.5F (37.5C), it will hatch birds for you, assuming your eggs are fertilized.
What does matter more when looking to buy an incubator (or even building one) is if it is still air or if it has a fan to move air. The hatch rate in fan incubators is better because there are no hot spots. It is the same even temperature in every corner of the incubator. With still air incubators (usually the styrofoam types and plastic “3 egg” types on Amazon), you have a heat source, but the air does not move, so that heat source puts out heat, but that heat is uneven in the incubator. The closer you are to the heat, the hotter you are. This leads to inconsistent temperatures and, therefore, inconsistent hatch rates.

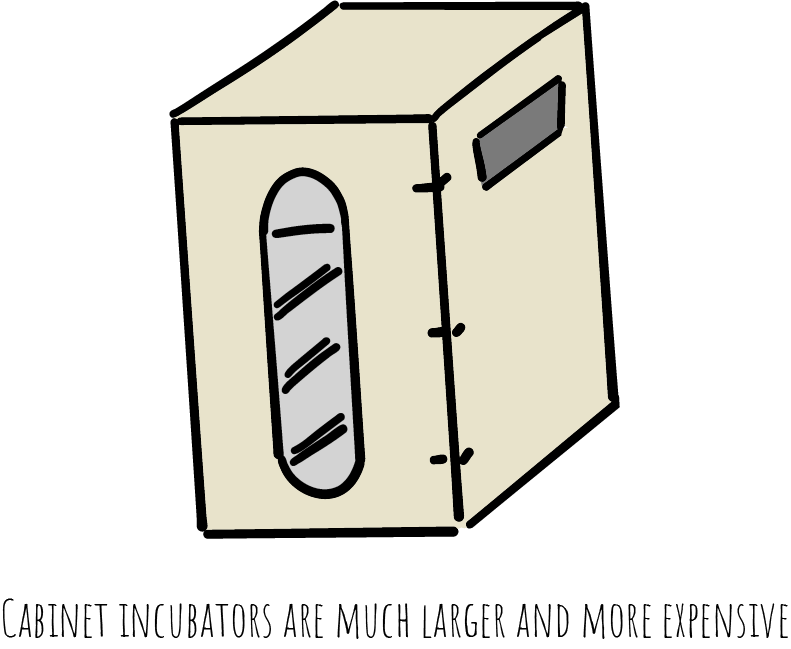
There are tabletop incubators and there are cabinet incubators for the general market. Hatcheries can have full on rooms that are incubators, but that is likely not in your budget. Most people start with tabletop incubators, which are exactly what they sound like – incubators you need a table to place it on. Depending on the brand and egg count they hold, they typically take up 12 to 18 inches of space and may or may not come in a fan model. Often, they have an optional turner to purchase extra. If you have the money for a cabinet incubator, you may want to invest in one. The turner is usually built in, as well as a water trough for humidity. This said, they usually are incubators and “hatchers” are sold separately. There are ways around this, but it takes forethought and planning on your part. You don’t want chicks hatching in the top shelf and falling to the bottom.
Hatchers are technically incubators, but they are ones designed for the last 3 days of incubation (this is collectively called “lockdown” online). We will get more into that below, but know that when looking to buy an incubator, if it says “hatcher” – it is not the same item you are looking for.
For what it is worth, I have used many of these and still do. If I don’t have a huge hatch, I will still use the tabletop incubators. I have my personal favorite brands but that is mostly because of their controls. There is a certain brand that has a horrible controller for temperature, and it is an absolute guessing game. For legal reasons I will not mention the name but take time when looking to buy an incubator to find out how to adjust heat. If it is a knob, especially one that has no markings, beware.
HOW EGGS TURN TO CHICKS
When the egg gets heated to 99.5F development begins. This can be done by a hen sitting on them, an incubator, or even left out in the hot coop too long. As the egg continues to develop; vessels start to form, then organs, then lastly the fuzz of the chick. The chick will absorb the yolk in the last hours before popping out. It looks a little like this if candled (lighting the egg to see inside):

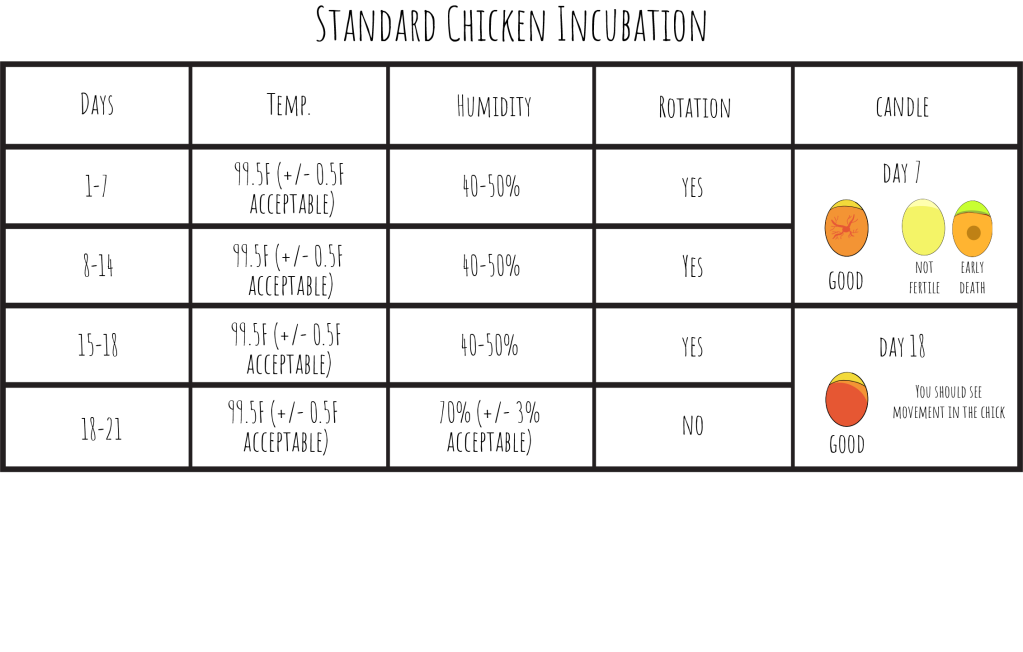
You need your incubator to hold a steady 99.5F. The temperature will naturally go up or down by a fraction of a degree, do not freak out about this. It is just important to get a good incubator that will hold the temperature and/or have the incubator running in a place that does not have giant temperature swings.
Humidity needs to be at 40-50% for the first 18 days of incubation. The last three days you want to bump the humidity up to 70%. This is honestly the trickiest part of incubation. What amount of water works for me here in the Southeast will not be what works for you in the desert. The best thing to do is set your incubator up and running for a few days with a hygrometer in there. Monitor your situation before you add eggs. Most of the major brands of incubators will have built in water trays. Start there and see if you need more or less water. Remember! Humidity is created by surface area of water, not depth. The dangers associated with incorrect humidity are usually seen at the end of the 21 days. If the humidity was too high, the chicks literally can drown because the air cell is holding fluid. On the other hand, if the humidity was too dry; the chick can become what the internet age has dubbed “ziplocked”. This is where the membranes dry and shrink around the chick, suffocating it. Remember above we mentioned how strong it is because it is made of keratin. Again, humidity is the hardest part to get right. It truly is worth it to run your incubator for a few days without eggs to perfect what it takes in your home to get the right hygrometer readings. It also should be mentioned that wherever you are hatching should be kept stable for those 3 weeks, meaning, no running humidifiers/dehumidifiers off and on and/or opening windows. For that same reason, bathrooms are not ideal as showers will make the humidity spike too.
Eggs need to be turned often. In nature, the mother does this. If you are incubating, you have two options usually. You can turn them yourself by hand, or you can invest in an automatic turner. Automatic turners can be just plug in and go types or you may have a fancy one with a computer and can pick your settings. If you are turning by hand, the old trick of putting a “X” on one side and an “O” on the other will help you keep track of what rotation you are on. The key to hand turning is do it in odd numbers a day like 3,5, or 7. The reason is that it will keep the eggs alternating which side is up at night when you are sleeping and more likely to have a long pause in the hand turning. Turning is an important step as it keeps the yolk and chalazae from sticking to the membranes and causing issues with the chick’s development and hatching. I have to hand turn my geese eggs and find that 3 times a day is plenty. Some would say the more the better, but I have nearly lost the hatch when hand turning because of the human factor and being klutzy. I would argue the less you mess, the better.
HUMAN ELEMENT
To sum it all up, in short. Hatching in an incubator is not hard. If you listen to the 500 opinions online, you will find yourself so lost and confused. Everyone has an opinion and very little of them have years and years of experience with different brands and styles and breeds and species. I am here to tell you, you got this. “Set them and forget them” is what I like to tell people. The more you fret and hover over them, the worse you can make it. Know your incubator, know your home/climate, test out your machine before you set eggs and you will be fine. Know what you know and know that you know it. Part of knowing what you know is knowing that not all the eggs will hatch and that is ok. Knowing that sometimes you can do everything right and things still happen. Sometimes the hatch rate of fertilized eggs is bad because of the parent’s diet. It isn’t always you or your machine. I know it is extremely hard to not hover and worry, especially in the first few hatches you do. With every twist of the knob or opening of the lid or adding a sponge or whatever – you are running the risk of crashing the whole hatch. In the last 3 days, you should just go away. Leave the house. Chicks can take hours to make it all the way out of the shell. They have been doing this for thousands of years without your help. Do not help them out of the shell. Remember, they are absorbing the yolk which is filled with the nutrition they need to get a strong start. Their blood vessels are still exterior to their body and cracking the shell can cause their tiny amount of blood volume to bleed out. You also will cause huge issues with humidity, causing the membrane to dry too much too fast. I started years ago setting my eggs at night so they would likely hatch mostly at night, and I would be asleep and not even be tempted to help them. Even if you did help a chick and it survive, it could be crippled or deformed. You need to be prepared to either euthanize it or care for it for up to 30 years (which is the record for oldest chicken).
Now that I scared you to try, here is an easy chart of a perfect hatch to reference as you need it:
CANDLING
We have mentioned it a few times now. What is candling, exactly? Candling got the name from the 1880s when incubation in our Western cultures became a thing, people had to use candles to emit light. Today, we typically use a flashlight, cellphone, or a candler. It’s not that complicated. Do be advised, the shell color and the brightness of the light matters. A dark brown maran egg, for example, will need a very strong light to see into it. On the other hand, a white egg from a leghorn won’t take much. Also take caution on how you will have to hold the egg, taking safety in mind. I have used many types of flashlights to candle and nearly smashed my eggs using a big heavy high lumen light. Sometimes bigger isn’t better.
To candle, you will want to hold the egg in one hand and the light in the other. I find the top 45 degree mark (about 1 or 2 o’clock) is the sweet spot, but you can move it around a bit to see what works for you. You will have to put the egg directly to the light. Remember putting a flashlight to your finger as a kid to see your blood vessels? Same concept.
As I mentioned, there are store bought candlers. I have never used them, to be honest. I typically use cheap flashlights I have laying around and in more recent years I have used my cell phone. If it makes you feel better buying a product made specifically for candling eggs, go for it. Just know it is not necessary.
ALL THE TIPS AND TRICKS
By now you should know everything you need to know about how to hatch eggs. I hope this article brings you a sense of confidence to take it on. Fair warning, it is extremely addictive. You will likely become a hatch-aholic. There is something so fun about watching babies pop out of an egg that 3 weeks ago was just an egg.
Just to recap for those who will want to reference this quickly, we will do a bullet style so it can be more easily digested.
Yes, Do This:
- Test your incubator out
- Wash your hands before touching eggs
- Touch eggs minimally to keep bloom intact
- Set shipped in eggs small end down for 12-24 hours before putting in incubator
- Set eggs small end down in rotator if applicable
- Use minimal markings on eggs
No, Do NOT Do This:
- Wash eggs with soap and water
- Refrigerate eggs
- Use eggs that are more than 2 weeks old (from our own flock)
- Use an unclean, unsanitized incubator
- Use poopy eggs
- Incubate eggs with cracks or imperfections
- Open the incubator up more than needed to turn eggs or candle
- Play with or adjust the temperature and/or humidity once eggs are set
- Help chicks out of the shell
I hope this article helps you with you hatching success. I have hatched so many eggs over the years that I honestly don’t know how many I have hatched. I have shipped eggs in for me to hatch and I have shipped out eggs for others to hatch. It seriously is addictive. What breed(s) do you plan to hatch out next? I would love to hear from you! Tell me how it went if you did just hatch. Did I miss anything in the post?
Stacy Tate

Leave a comment